Opinion & Analysis
Avoid these 5 club building disasters

I’ve been fitting and building golf clubs for more than 15 years, and in that time I’ve seen a lot of really poor workmanship — stuff that would make most GolfWRXers cringe. But like anyone who ever did anything new, I didn’t start being naturally good at putting together clubs. It took a lot of time, ruined components, and trial and error to get where I am today.
I believe my attention to detail now stems from the fact that my dad was a machinist by trade, and anytime we ever worked on something together his attitude was to take your time and do it right the first time. My dad’s approach always had an impact on me, because I feel that if you do something right — even when it takes a bit longer — the job is not only more satisfying, but also makes things work better and last longer.
The goal with this article is to help WRXers avoid the most common mistakes and assumptions in club building that lead to broken or ruined clubs, as well as real danger.
Over-prepping a graphite shaft
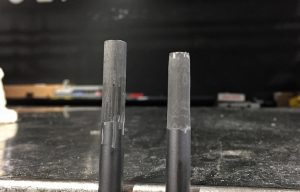
The shaft on the left has been prepped properly. The one of the right, which has noticeable taper, shows signs that layers of graphite have been removed.
This happens far more than it should, and can ruin an expensive new shaft purchase. To prepare a shaft properly for installation, you only need to remove enough of the paint to make sure that the epoxy adheres to the graphite. This is also true for the inside of the hosel.
Be careful to remove residual epoxy, dirt or rust (common with forged carbon steel club heads that have been sitting around for a while), or some type or solvent like the one used to put on grips, as it can cause of bond to break down very quickly. A proper reaming tool, a wire brush and some compressed air (either a small can or a large air compressor) can make cleaning simple, and prevent a golf club from falling apart.
UPDATE: Over prepping specifically applies to shafts that are designed to go into parallel heads and is especially important for 335 shafts with less material at the tip going into drivers and fairway woods. For information on how to properly taper a shaft to go into a tapered head, check out the video below:
Overheating a Shaft When Pulling it
This is what happens to a graphite shaft when overheated, and the resin holding the graphite sheets together breaks down. It’s not always as noticeable, but if the shaft starts to fray it means the bonds have been compromised and it’s more likely to fail.
Overheating a shaft when pulling it is another common mistake that can result in ruining a golf shaft. It also highly increases the chance of breakage. There are quite a few methods I’ve learned over the years to remove a shaft from a club head, from heat guns to large propane torches, but personally I find that using a small butane torch with a regulator for graphite offers the best results. It allows a club builder to easily control and focus the heat only where it’s needed. Bigger torches are fine for iron heads, as long as you don’t damage any plastic badges in the cavity or materials in slots around the head.
One of the best advances in club technology has been the invention and mass adoption of adjustable hosels. They not only help golfers adjust the loft, lie and face angle of club heads, but have also greatly decreased the need to pull shafts. So as long as a golfer is staying with the same metal wood manufacturer, they can usually test several different clubs heads with the same shaft, or vice versa — several different shafts with the same clubhead.

That being said, one of the most important tools that any hobbyist club builder should have or have access to is a high-quality shaft puller. It’s a necessary tool for anyone who wants to do repairs and helps prevent damage to a shaft while pulling it. The more linear pressure that can be applied to the clubhead, and the less heat used to break down the epoxy, the better. It makes sure both the shaft and the head are reusable in the future. For steel shafts, you can use a bit more heat, and twisting isn’t a problem. Again, with increased heat, be careful not to damage any of the badging, or permanently discolor an iron head.
Botching a Grip Installation
Using calipers and two-sided tape, you can replicate the taper of shafts to makes every grip feel exactly the same size in your set.
This one seems simple, but when really getting down to professional level detail, it is quite important. We ALL have a preference and different opinion of what feels good in a golf grip, as well as different sensitivities. For example, we all have the ability to figure out what apple is bigger, even if blindfolded because over time we all develop brain function to understand shapes and sizes. This also applies to grips. If you use the same grips on your 13 clubs, you could potentially have 4-5 different final sizes depending on how many different types of shafts you use, because many shafts have different butt diameters.
Some shafts have larger butt diameters, while others taper faster than others. That’s why it’s very important to own a quality set of vernier calipers, and know how to properly use them. It’s also the same for putters, since many putter shafts are smaller in diameter. I have lost count of how many times I’ve had people bring me, putters, where the bottom half of the grip is twisting and turning because the installer never paid attention to the interior diameter of the grip, the exterior diameter of the shaft, and how it changed from top to bottom.
Using epoxy that’s doomed to fail
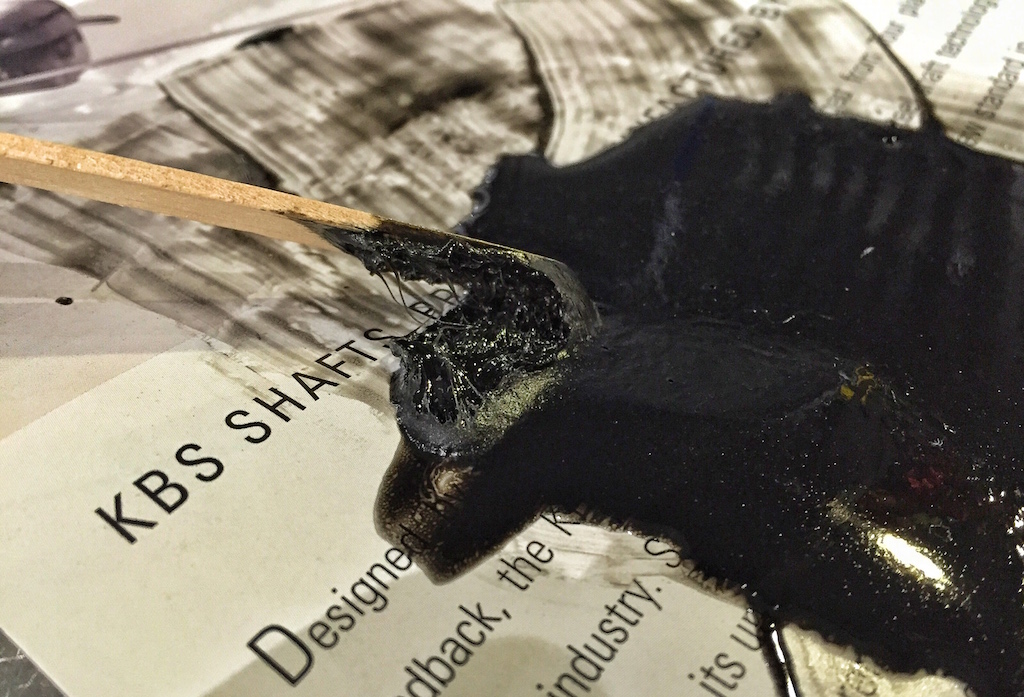
An example of epoxy that although not completely set, is no longer safe for assembling clubs.
I’m a bit of a physics nerd and garage engineer, so this is one of those topics that goes beyond just the physical aspects of club building and into the realm of chemistry.
Here comes my nerd-out moment: In the simplest of explanations for a 0.335-inch driver hosel with an insertion depth of 1.25 inches, the amount of calculated surface area the epoxy can bond between the shaft and the head using the internal dimensions of the head is 1.49 square inches. That’s not a whole lot of area when you consider the centrifugal force being applied to a driver head traveling at 100 mph, and then the forces of torque that also come into play when a shot is struck.
In a PERFECT world, almost zero torque is applied to a shaft when a shot is hit on the center of gravity (CG) of the club head, perfectly aligned with the center mass of the ball, while traveling in the intended direction. This is vectors 101 of physics. Unfortunately, almost every single shot is NOT hit like that, and this is where the epoxy bond is put under the most amount of stress. Lap shear strength of epoxy goes beyond me, but it proves that building a golf club is not just cut and glue after all.
Note: For those of you curious, the most popular epoxies are rated for 4500 psi.
As far are actually working with epoxy, first things first. Always check to see if the epoxy has a best-before date (yep, just like milk). Also, never store epoxy in direct sunlight. If you are using epoxy from a tube in a dispensing gun, you are using what is an almost foolproof method. Plunge out the necessary amount, mix for about a minute (mix! don’t whip), and remember, the less air that gets into the epoxy the better. If air gets in and the epoxy cures with bubbles in it, then you end up with a club that will often “creak.”
For those using two parts in larger bottles, the best way to ensure proper ratios is to pay attention to the weight ratio rather than volume. This isn’t arts and crafts; it’s chemistry, so by using the weight to calculate the ratio you will get the right amount of each part every time, and help decrease the risk of failure down the road. If you have mixed a larger batch and plan on building quite a few clubs at a time, you really have to pay attention to the consistency and viscosity as time goes on. You don’t want to glue a club head with epoxy that has started to set.
Turning an Extension into a Shank
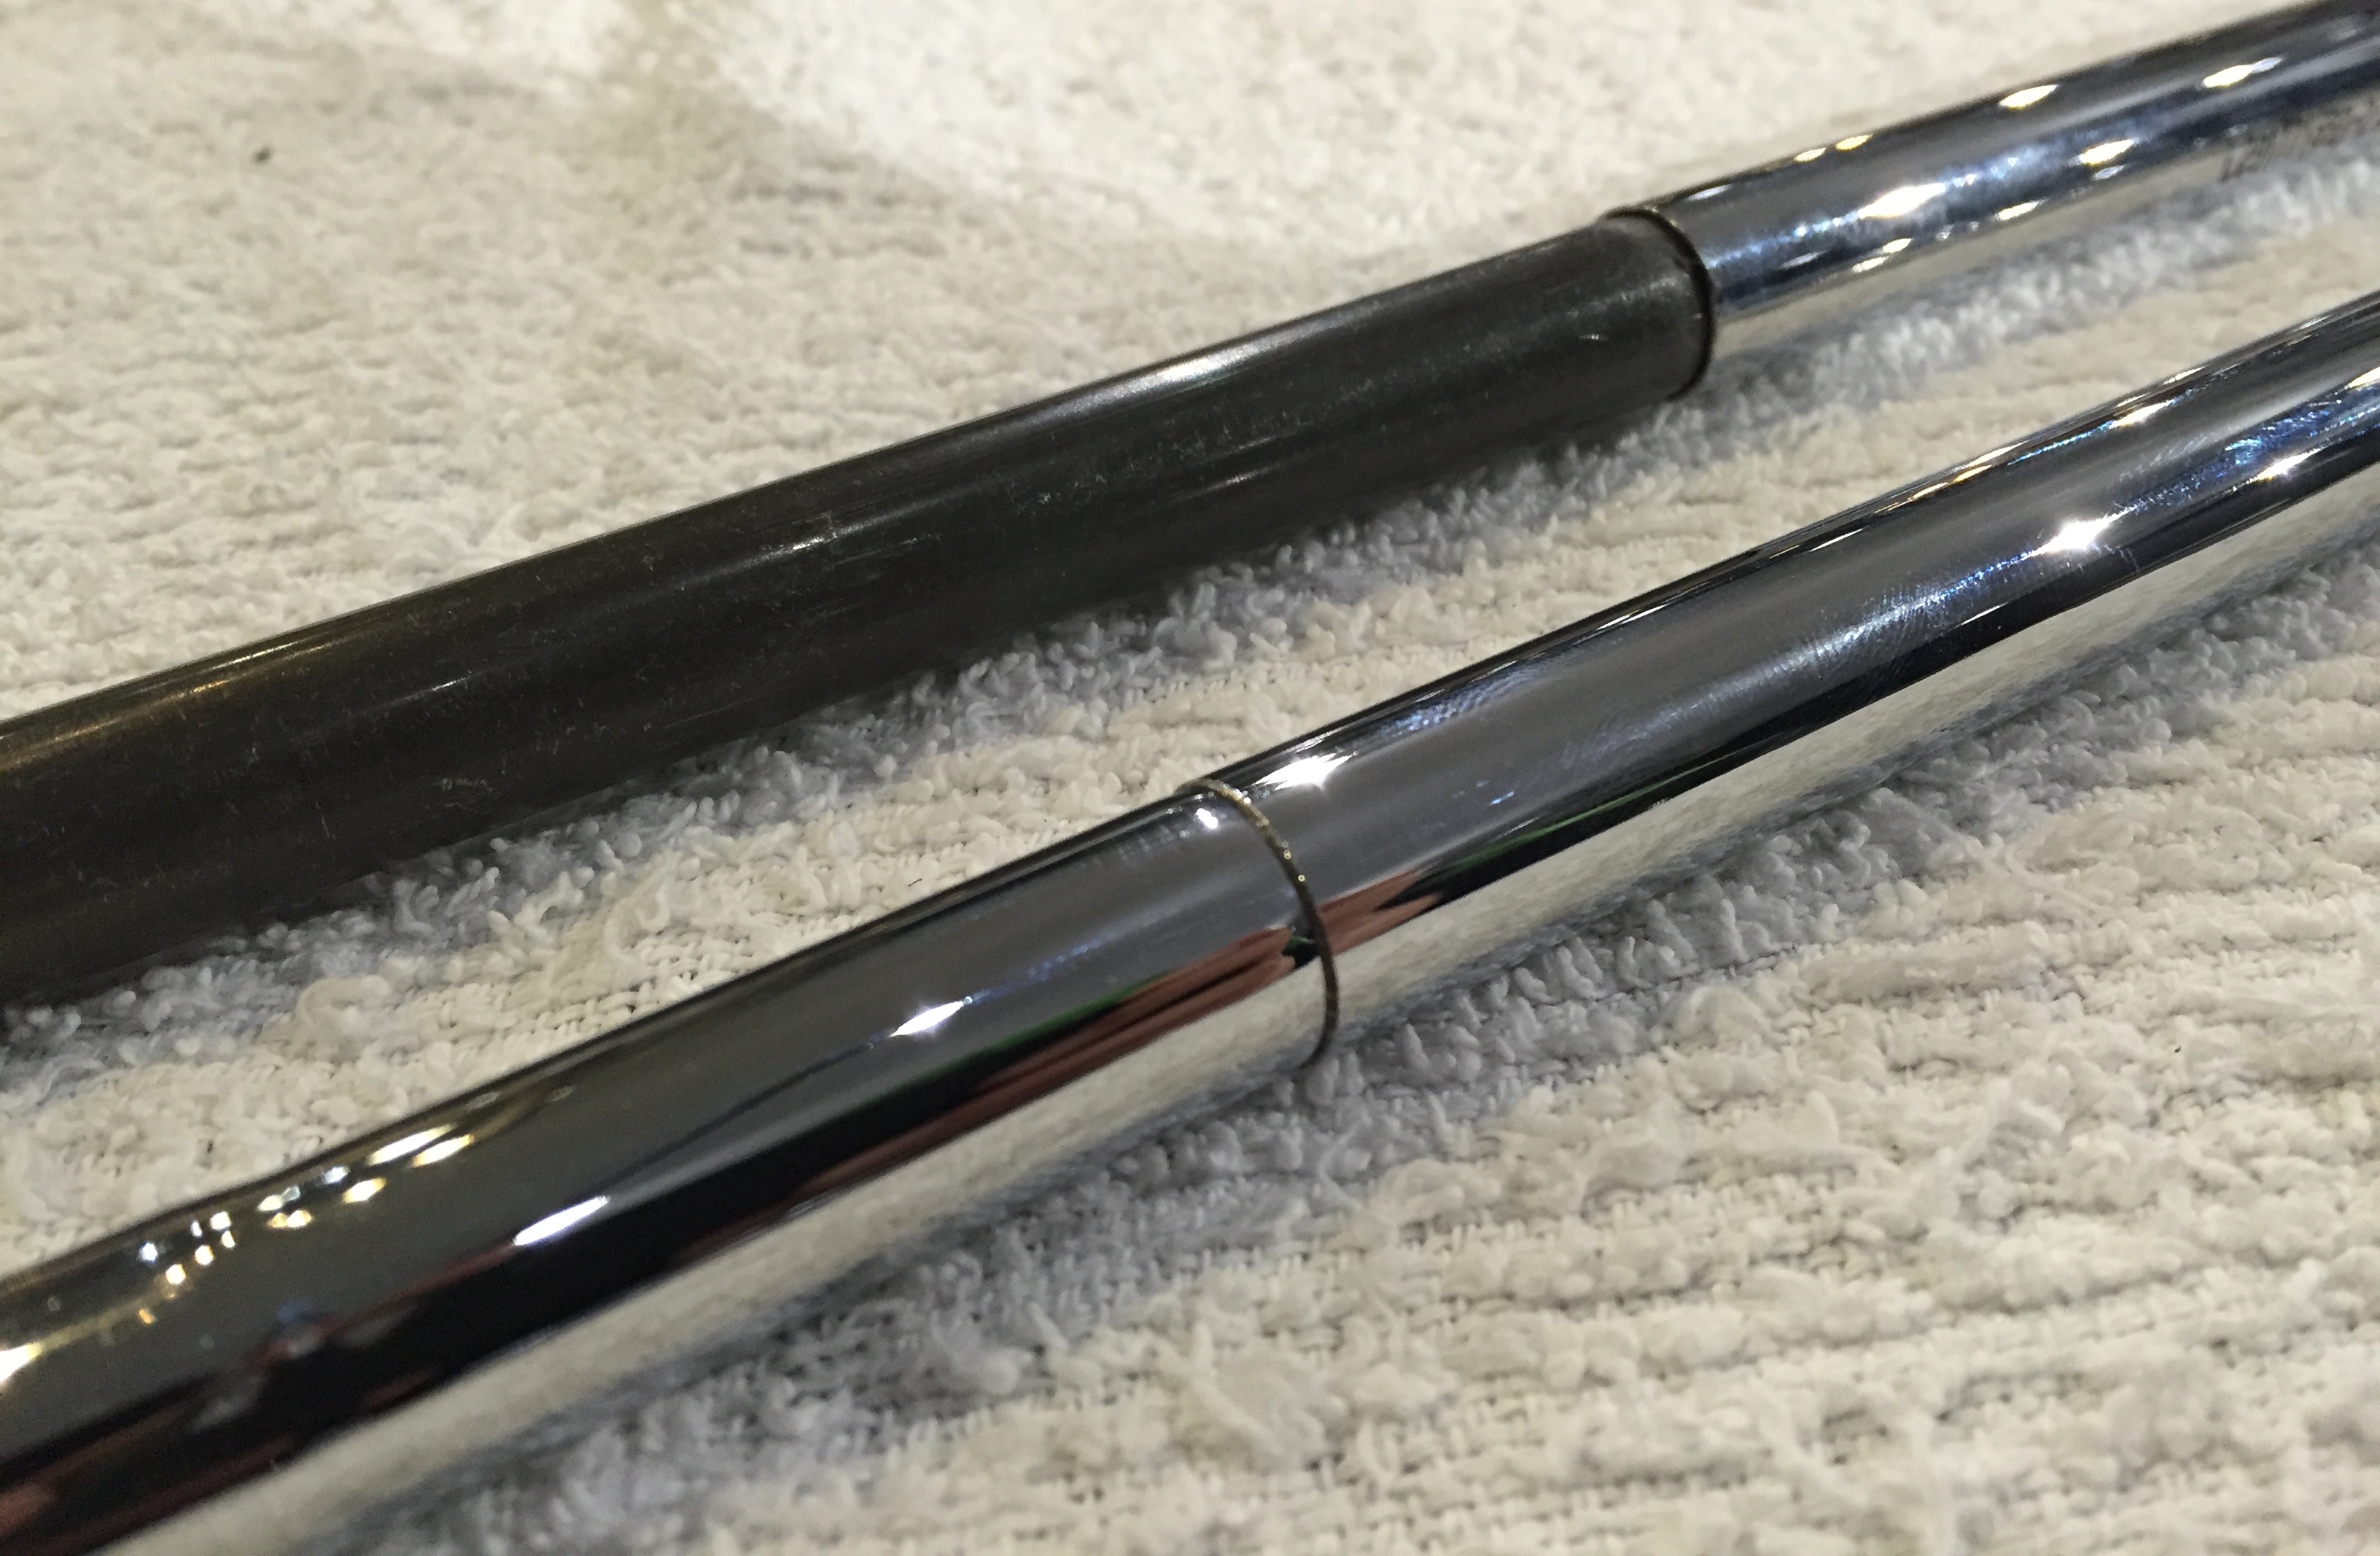
The difference between a good shaft extension (bottom) and a bad one.
This is one of those subjects I don’t even like to talk about. I very much dislike using extensions when building clubs, especially clubs with graphite shafts. Going back to my “do-it-right-the-first-time” mentality, extensions are a Band-Aid fix to a problem that requires surgery. They also counter-balance the club, and by their very nature create a weak point because of the small wall thickness at the butt end of a shaft. The only clubs I don’t mind extending on a regular basis are putters since they are never put under the same level of stress as a club being swung at full speed. I also never extend a club more than 1 inch, because I have been witness to horror stories of clubs that have been overextended that not only break but rip through the grip and cut people’s hands very badly.
If you are going to extend a club, it’s important to make sure the fit is very snug and doesn’t cause the extension to lean in any direction. It’s also best to have the epoxied extension cure with the club on its side to avoid an excess epoxy from running down the shaft and breaking off and causing a rattle.

This past Monday, I played in the U.S. Amateur local qualifier at Rock Creek Country Club in Portland, Oregon. A full tee sheet from 7:30 a.m. to 1:55 p.m., the top 11 scores would make it to the U.S. Amateur final qualifying.
I teed off at 10:48 a.m.. With the 7:30 am tee time, you can get a feel for the leaders’ pace, and they were off and running on the challenging setup at Rock Creek.
View this post on Instagram
Getting to the highlight of the round on the par five 17th, a drive up the left side and 212 yards left to the front hole location. I took out a 5-iron with plans of middle of the green. The ball ended up 8 feet left of the hole, pin high. A slight downhill putt dropped in for an eagle 3 on the 17th. With the cut line looking to be anywhere from -2 to even par. This was the boost I had been waiting for all day.
With making par from the trees on 18, it was time to wait for a potential playoff with a posted score of one under par 71.
Three hours later, it was playoff time. 8 players for 6 spots. I made par on the playoff hole, which was good enough to advance to the U.S. Amateur final qualifying in July. USGA qualifiers sure deliver on all of the emotions in golf!
Club Junkie
Building my 2026 gamer WITB: Ranking the contenders and new putter projects – Club Junkie Podcast
The annual What’s In The Bag build is underway, and on this episode of Club Junkie, Brian breaks down the clubs currently leading the race for a spot in his 2026 gamer setup. From drivers and fairway woods to irons, wedges, and shafts, he ranks the equipment that’s performing best and explains what’s separating the front runners from the rest of the field.
Brian also heads into the workshop to discuss several putter projects currently on the bench. From head options and shaft choices to build ideas and testing plans, he shares what he’s working on and which putters could become serious contenders for the bag this season.
If you’re a gear junkie who loves equipment testing, club building, and the never-ending pursuit of the perfect setup, this episode is for you.
Follow Club Junkie:
Instagram: @clubjunkiepod
TikTok: @clubjunkiepod
Threads: @clubjunkiepod
X: @ClubJunkiePod
Club Junkie
Tour Edge Exotics mini driver review + TaylorMade Spider ZT Max first look – Club Junkie
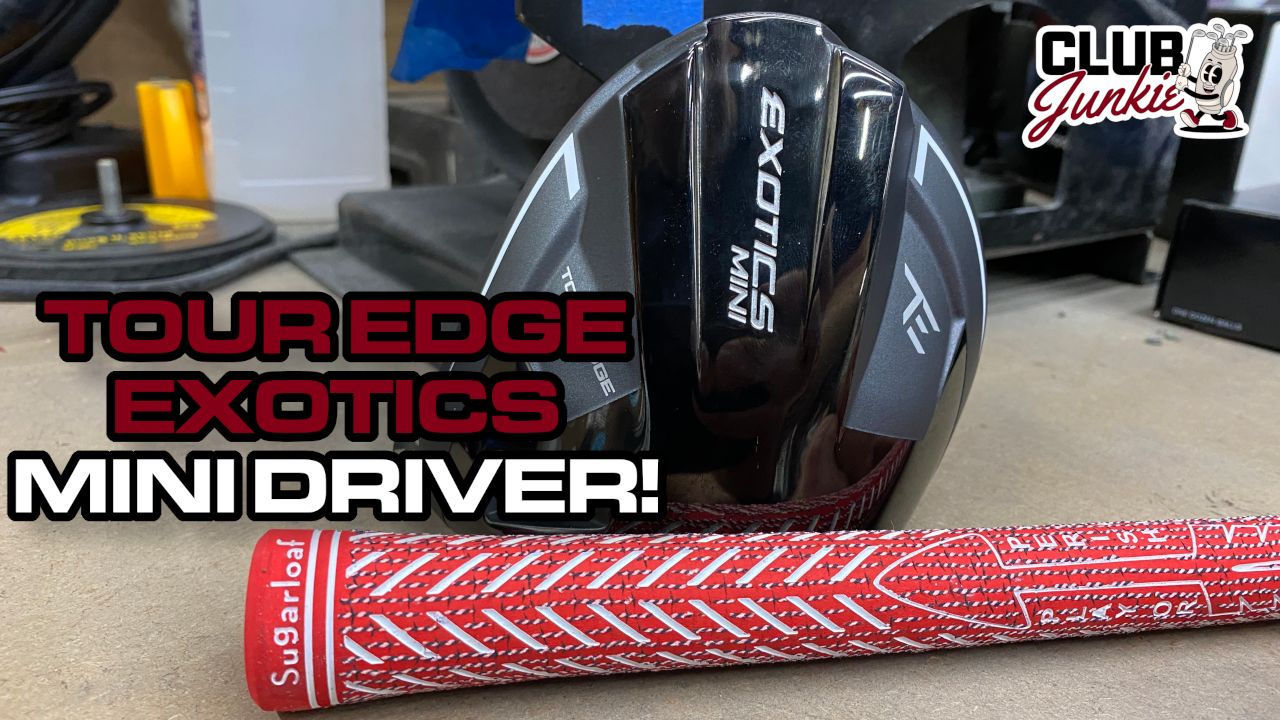
On this episode of Club Junkie, I put the new Tour Edge Exotics Mini Driver to the test and break down the performance, forgiveness, distance, and where it fits compared to a traditional driver or strong fairway wood. If you have been curious about adding a mini driver to the bag, this one is worth a look.
I also dive into the new TaylorMade Spider ZT Max putter that was recently spotted and discuss the growing zero torque putter trend. Plus, there is a closer look at the new Project X Titan Yellow shaft showing up on the PGA Tour and what makes it different from other profiles currently out there.

Justin Rose WITB 2026 (April): Full WITB breakdown with new McLaren irons

What’s the story behind Webb Simpson’s custom-stamped irons?

Memorial Tournament Tour Report: Rory McIlroy, Cameron Young switch up drivers, and more

Cadillac Championship Tour Report: Spieth’s sizable changes, McLaren Golf launches, and more

Russell Henley’s winning WITB: 2026 Charles Schwab Challenge

Kristoffer Reitan’s winning WITB: 2026 Truist Championship

J.T. Poston’s winning WITB: 2026 Memorial Tournament

Aaron Rai’s winning WITB: 2026 PGA Championship

Best irons 2026: Best irons overall, most forgiving irons, and more

Cameron Young’s winning WITB: 2026 Cadillac Championship


Bud Cauley WITB 2026 (June)
Bud Cauley had >14 clubs in his bag when photographed prior to the Memorial Tournament. Driver: Titleist GTS2 (8 degrees) Shaft: Fujikura...


Hannah Green WITB 2026 (June)
Driver: Titleist GTS3 (10 degrees, D4 SureFit setting) Shaft: Mitsubishi Chemical Diamana RB 53 S 3-wood: Titleist GT3 (15 degrees,...


Asterisk Talley WITB 2026 (June)
Driver: TaylorMade Qi4D (9 degrees) Shaft: Fujikura Ventus Blue 6 S 3-wood: TaylorMade Qi4D (16.5 degrees) Shaft: Fujikura Ventus Blue...

Brianna Do WITB 2026 (June)
Driver: Callaway Quantum Triple Diamond (9 degrees) Shaft: KBS PGW 3-wood: Callaway Elyte Titanium (15 degrees) Shaft: KBS PGW 5-wood:...
-
 Equipment6 days ago
Memorial Tournament Tour Report: Rory McIlroy, Cameron Young switch up drivers, and more
-
 News1 week ago
Russell Henley’s winning WITB: 2026 Charles Schwab Challenge
-
 Whats in the Bag3 days ago
J.T. Poston’s winning WITB: 2026 Memorial Tournament
-
 Equipment3 days ago
Best irons 2026: Best irons overall, most forgiving irons, and more
-

 Equipment1 week ago
Details on Jason Day’s latest prototype Avoda iron setup
-

 Equipment3 weeks ago
CJ Cup Byron Nelson Tour Report: Koepka and Kim’s newest putters finally get hot
-

 News2 weeks ago
Charles Schwab Challenge Tour Report: MacIntyre, Åberg and Spaun all switch putters, TaylorMade launches new Spider
-
 Equipment2 weeks ago
Details on J.J. Spaun’s surprise putter switch
Jim D.
Aug 15, 2019 at 7:59 am
I appreciate your work and thoughtful information. What are your thoughts regarding the use of “bonding beads” in the epoxy mix. When applied to the shaft the beads are intended to assist in centering the shaft in the hosel when reshafting. I’d be interested in your opinion and your experience regarding this process.
Thanks!!!!
Jim
Locode
Jul 18, 2016 at 2:40 pm
Great article. I extended 2 sets of my own irons a full 2 inches and never had a problem with them.
One point. A CREEK is a narrow running waterway, bigger than a stream and smaller than a river.
A CREAK is that sound you hear from your golf club for whatever technical reason.
Ken Boucher
Apr 30, 2019 at 4:45 pm
If you extended your clubs 2″ you are begging for trouble. Also the swing weight would be extremely high,not good.
Ryan
Jun 30, 2016 at 12:39 pm
A good rule for hobbyists to follow for prepping graphite shafts is to mask off where you want to prep and then take a box cutter and start at the line of the tape and “scrape” down towards the tip of the shaft. You will never damage the shaft and a good bond will form with the epoxy.
Other issues I run into with “rookies” is not cleaning out the hosel properly. Prep is the key to building quality golf clubs that don’t fail. Also spend the extra 20 seconds and really mix the epoxy well. Once mixed, throw a heat gun on the epoxy for about 5-10 seconds and “heat cure” it. It will make a stronger bond.
And to Charlie above, typically when you add extensions it will zero out to a certain extent because the extension weighs more than the amount of shaft that was removed. The problem is the static weight of the club is heavier. I follow the rule of building a club off a 50g grip and building to that. I also don’t like using extensions and rarely ever use them. About 1/2″ and down will decrease the SW and anything over 1/2″ will increase the SW. I build clubs to 10 points higher without the grip and then install the grip.
Sam Snood
Jun 30, 2016 at 10:58 am
I always thought the creaking/squeaking sound was the ferrule moving slightly.
John Grossi
Jun 30, 2016 at 9:02 am
I have owned 2 adjustable drivers, a cobra amp and a callaway xr, and they both creek. Neither ever worked on so must be the factory glue. Very impressed with your knowledge and willingness to share it. Thanks
Golfrnut
Jun 30, 2016 at 3:31 pm
Many of the adjustable heads are creaking due to the mating surface of the adapter and socket rubbing together. It’s not always an issue with the epoxy bond. Something a little WD-40 wiped on the adapter or a light coat of graphite paste can remedy it a lot of times.
graymulligan
Jun 29, 2016 at 9:49 pm
Thanks for a really well written, simple, concise article on something that might help a bunch of folks. It’s funny, I never really equated the idea of bubbles and creaking (“creek”…lol), but it makes a ton of sense, and is something I’ll make sure to pay more attention to going forward.
BIG STU
Jun 29, 2016 at 5:29 pm
Good article I have been building and tinkering with clubs over 30 years. As Brian stated I have learned from past mistakes. Maybe giving heed to the advice in this article will keep some folks from learning from the school of hard knocks.
Bert
Jun 29, 2016 at 3:27 pm
Great article thanks! Been tinkering for years and improved my techniques the hard way. Many bad results can challenge ones methods, perhaps saying “why did I do that”?
Bobalu
Jun 29, 2016 at 9:42 am
Good to see the first (?) club building article on GOLFWRX!
Tom
Jun 29, 2016 at 10:59 am
agreed.
peter collins
Jun 29, 2016 at 2:08 pm
here here, more club building topics please.
Scott
Jun 29, 2016 at 2:55 pm
+1
Smith
Jun 29, 2016 at 9:09 am
I was in a couple weeks ago and Ryan did a re-shaft/hotmelt on a Cobra Bio Cell fairway of mine. His work is second to none! If you’re in the Toronto area (or near any other MG locations), you’re honestly doing a disservice having club work done anywhere else.
M Sizzle III
Jun 29, 2016 at 9:06 am
I’ve been to Modern Golf’s facility in Toronto, Canada and it is amazing. Like a laboratory! All should visit if they have a chance. No, I don’t work there nor do I have a relationship with the company.
Charlie
Jun 29, 2016 at 8:35 am
I’d put not checking swingweight up there as well. You put your extensions from #1 on a club and you’ll be sitting at an E5.